| |
Using the 3-axis accelerometer on the PR2 gripper
Description: Introduction to the 3-axis accelerometer on the PR2 gripperTutorial Level: INTERMEDIATE
Next Tutorial: Controller for gripper accelerometer Writing controller for the accelerometer on the PR2 gripper.
Contents
Introduction
The new revisions of the gripper motor control board (MCB) has a 3-axis accelerometer. The accelerometer is the Bosch BMA150. It contain 10 bit acceleration value data at at 3kHz sample rate. The full scale acceleration range is configurable to +/-2g, +/-4g, or +/8g (g=gravity).
Viewing Accelerometer Data
As ROS topic
The gripper accelerometer data is published on a ROS topic. Running:
rostopic echo /accelerometer/r_gripper_motor
Should produce data like this:
header:
  seq: 14740
  stamp:
    secs: 1282083521
    nsecs: 167468635
  frame_id: r_gripper_motor_accelerometer_link
samples:
  -
    x: 7.3191796875
    y: -3.142265625
    z: 5.0966015625
  -
    x: 7.3191796875
    y: -2.988984375
    z: 5.441484375
  -
    x: 7.280859375
    y: -3.065625
    z: 5.4031640625
The accelerometer message is published by the realtime loop at 1kHz. The accelerometer samples at 3kHz so the messages usually contain 3 samples.
rostopic hz /accelerometer/r_gripper_motor
average rate: 1000.191
NOTE: there is a known problem with the accelerometers going to an error state where they seem to sample at rates far about 3kHz. If the accelerometer topic always outputs messages 4 accelerometer samples then the accelerometer is in this error state. See Troubleshooting Gripper Accelerometer for more information.
With Controller
The accelerometer data can be accessed by with a controller plugin. Currently the only way to change the accelerometer range and bandwidth settings are with a controller.
An example controller has been written to get users started and show how to change these settings. See Controller for gripper accelerometer for the example.
With diagnostics (pr2_dashboard)
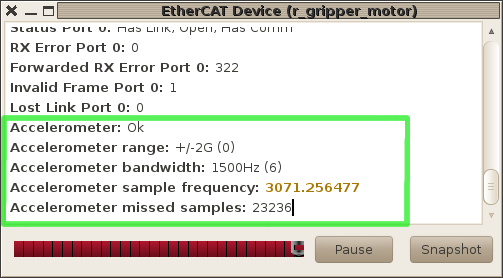
In newer releases (C-turtle) the diagnostic topic provides information on the accelerometer range and bandwidth settings are available in the diagnostics. The best way to view the diagnostics data on a PR2 is through pr2_dashboard.

NOTE: Accelerometer data is towards bottom of gripper diagnostics window.
Accelerometer Settings
Range
As mentioned before the range of the accelerometer is configurable. The accelerometer data is automatically scaled by the range value the data was sampled with. Changing the range setting *should not* cause inconstancies with the data.
Currently, the only way to change the current range of the accelerometer you will need to write a controller plugin. Example code has been provided to get users started that shows how to change these settings: Controller for gripper accelerometer.
Bandwidth
The accelerometer hardware has a averaging filter that can reduce the bandwidth of the data. For proper operation the bandwidth should be set to highest value (no filtering).
In future releases, they ability to changed the hardware bandwidth setting may be removed. If signal with less high frequency content is needed, use highest bandwidth setting and filter samples in software.
NOTE: On older software releases, the bandwidth mistakenly defaulted to lowest value. On newer software releases the bandwidth setting defaults to highest value. See Troubleshooting Gripper Accelerometer for more information on this bug.
Orientation
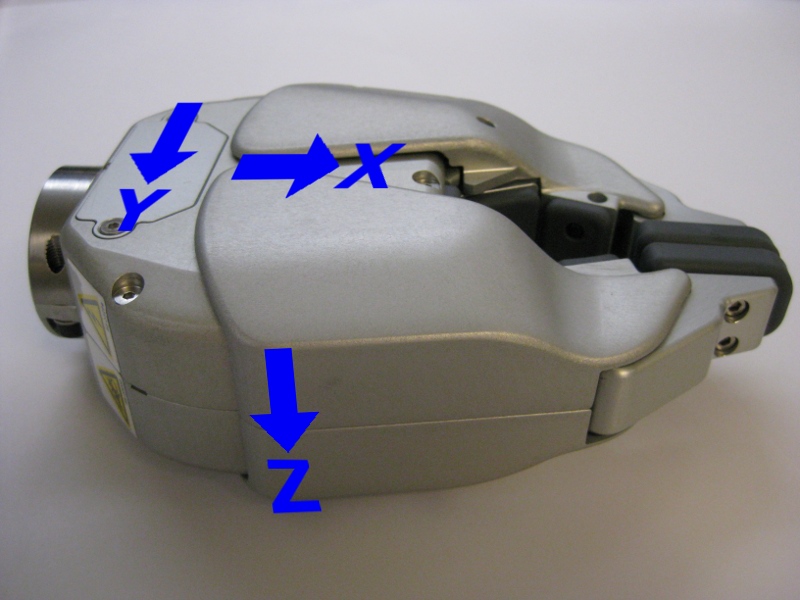
Below is a picture of the gripper and some information on orientation of the accelerometer X,Y,and Z axis.

NOTE: Use cover on top of gripper as orientation reference.
Troubleshooting
See Troubleshooting Gripper Accelerometer


