QAProcess: DevelopersGuide | Review Status | PackageProposalProcess | PackageDocumentation | APIReviewProcess | DocReviewProcess | CodeReviewProcess | StackDocumentation | StackVersionPolicy | AutomatedTesting | StackReleaseProcess | WritingTutorials | Graveyard
| Note: Before writing a tutorial take the time to review the ROS tutorials. |
| |
How to Write a Tutorial
Description: This tutorial covers useful template and macros for writing tutorials, along with example tutorials that are available for guidance on ros.orgKeywords: teaching, tutorials, writing
Tutorial Level: BEGINNER
Contents
How to Start
First, read the EditingTheWiki page.
Next, to start writing tutorials, go to the stack or package page where you plan on writing the tutorial. If there are no tutorials yet go to the non-existent /Tutorials wiki page.
After you open the page you will be redirected to:

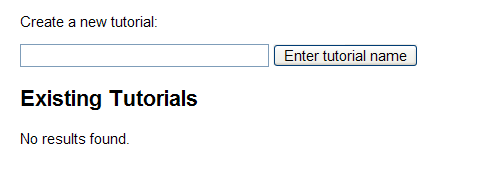
Click on the TutorialIndexTemplate link, and save the suggested preview without changes. This will create a new page for creating tutorials as shown below:

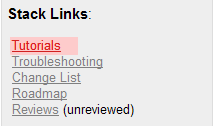
This page is useful for creating tutorials and will display the list of current tutorials. In the sidebar of the stack or package page there will be a link created for tutorials as shown below:
|
|
Creating a New Tutorial
In the create a new tutorial box enter a page name for your new tutorial and click the button. This will create a new page using the TutorialTemplate which looks something like (some ! are added in front of the keys so that the header for this page is generated correctly):
####################################
##FILL ME IN
####################################
## for a custom note with links:
## !note =
## for the canned note of "This tutorial assumes that you have completed the
## previous tutorials:" just add the links
## !note.0=
## descriptive title for the tutorial
## !title =
## multi-line description to be displayed in search
## !description =
## the next tutorial description (optional)
## !next =
## links to next tutorial (optional)
## !next.0.link=
## !next.1.link=
## what level user is this tutorial for
## !level= (BeginnerCategory, IntermediateCategory, AdvancedCategory)
## !keywords =
####################################

!<<IncludeCSTemplate(TutorialCSHeaderTemplate)>>
Note that until you save the page at least once, the preview button does not seem to be working properly.
Filling in the Template Header
The above template is used to auto generate a header similar to the one at the top of this page. Now let's look at the different parts of the template and how they are used.
Note
Note generates the blue box at the top of the page with reminders or information for a someone about to follow your tutorial.
This filling text in here will generate a completely custom note that looks like below
note= This is my awesome text
Note: This is my awesome text. |
Otherwise you can use:
note.0=[[ROS/Tutorials|ROS tutorials]]
note.1=[[Documentation| ros.org]]
This will add the link to the end of the standard note, This tutorial assumes that you have completed the previous tutorials: similar to below:
Note: This tutorial assumes that you have completed the previous tutorials: ROS tutorials, ros.org. |
Note that if you want to place links in your custom text for the note they should go in-line rather than in note.0, note.1, etc. This will keep "This tutorial assumes that you have completed the previous tutorials:" from appearing undesired.
Title
This is a descriptive title that will be displayed at the top of the page and also be the title of the tutorial displayed in the tutorial index page.
!title= My Awesome Tutorial
Description
This is a description that will be displayed at the top of the page and also be the description of the tutorial displayed in the tutorial index page.
description= My awesome tutorial is amazingly awesome and cool, you won't even believe it, do it now!
This will look like:
Description: My awesome tutorial is amazingly awesome and cool, you won't even believe it, do it now! |
Next
This is used for linking to any next tutorials that might come after your tutorial, these fields are optional and will display nothing if not filled.
next=Here are the next awesome tutorials
next.0.link=[[ROS/Tutorials|ROS tutorials]]
next.1.link=[[actionlib_tutorials/Tutorials|actionlib tutorials]]
This will look like:
Next Tutorial: Here are the next awesome tutorials ROS tutorials actionlib tutorials. |
OR you can:
next.0.link=[[actionlib_tutorials/Tutorials|Actionlib tutorials]]
Which will look like:
Next Tutorial: Actionlib tutorials. |
Level
This key serves a dual purpose, it let's the user know what level tutorial they are about to complete and is used as a category to search over for the tutorial index page.
level=AdvancedCategory
This will look like:
Tutorial Level: ADVANCED |
Keywords
Here you can add keywords to help users search for your tutorials.
keywords= great, cool, awesome
This will look like:
Keywords: great, cool, awesome |
Useful Macros
Here are some useful macros for helping you write tutorials.
Parsers
Currently the following parsers are installed on the wiki for your usage:
c++
- example:
{{{
#!cplusplus
#include <ros/ros.h>
int main(int argc, char** argv)
{
  ros::init(argc, argv, "talker");
  ros::NodeHandle n;
...
}}}
python
- example:
{{{
#!python
#!/usr/bin/env python
import roslib; roslib.load_manifest('beginner_tutorials')
import rospy
from std_msgs.msg import String
def talker():
    pub = rospy.Publisher('chatter', String)
    rospy.init_node('talker', anonymous=True)
...
}}}
CodeRef
In a tutorial, you want to reference a code block that you have created earlier in the tutorial you can use CodeRef.
{{{
#!cplusplus block=blockname
code....
is super
and awesome
}}}
You can then use the CodeRef macro to refer to it
<<CodeRef(blockname,1,2)>>
This then looks like:
This works with python:
Note that #!cplusplus or #!python line needs to be in a new line (ie. new line after three beginning parenthesises).
You have to save (not just preview) before the new code block becomes part of the system.
TutorialChain
The TutorialChain macro can be used to generate a list of Tutorials. It will walk the next links in each Tutorial.
<<TutorialChain(WritingTutorials)>>
This shows the title and description of the tutorial chain starting with the tutorial WritingTutorials.
- How to Write a Tutorial
This tutorial covers useful template and macros for writing tutorials, along with example tutorials that are available for guidance on ros.org
IncludeCSTemplate
This macro takes the keys at the top of the page and turns them into clearsilver variables that can be operated on using the clearsilver templating commands. In the case of tutorials the keys are used in the TutorialCSHeaderTemplate.
!<<IncludeCSTemplate(TutorialCSHeaderTemplate)>>
Embed Tutorials
You can embed videos using the Youtube and Vimeo macros
<<Youtube(Q5KC-trrw_o)>>
Example Tutorials
Here is a list of good tutorials to base your tutorials off of:


